Advanced Usage
Running a benchmark
Introduction to benchmarking
Automatminer can be used for benchmarking ML performance on materials problems in a standardized fashion. A common example use case is comparing one published method to another; another use is getting a rough idea how an Automatminer model will generalize to making “real” predictions. To mitigate unfair model advantages from biased splits or hyperparameter tuning, Automatminer uses nested cross validation with identical outer splits for benchmarking:
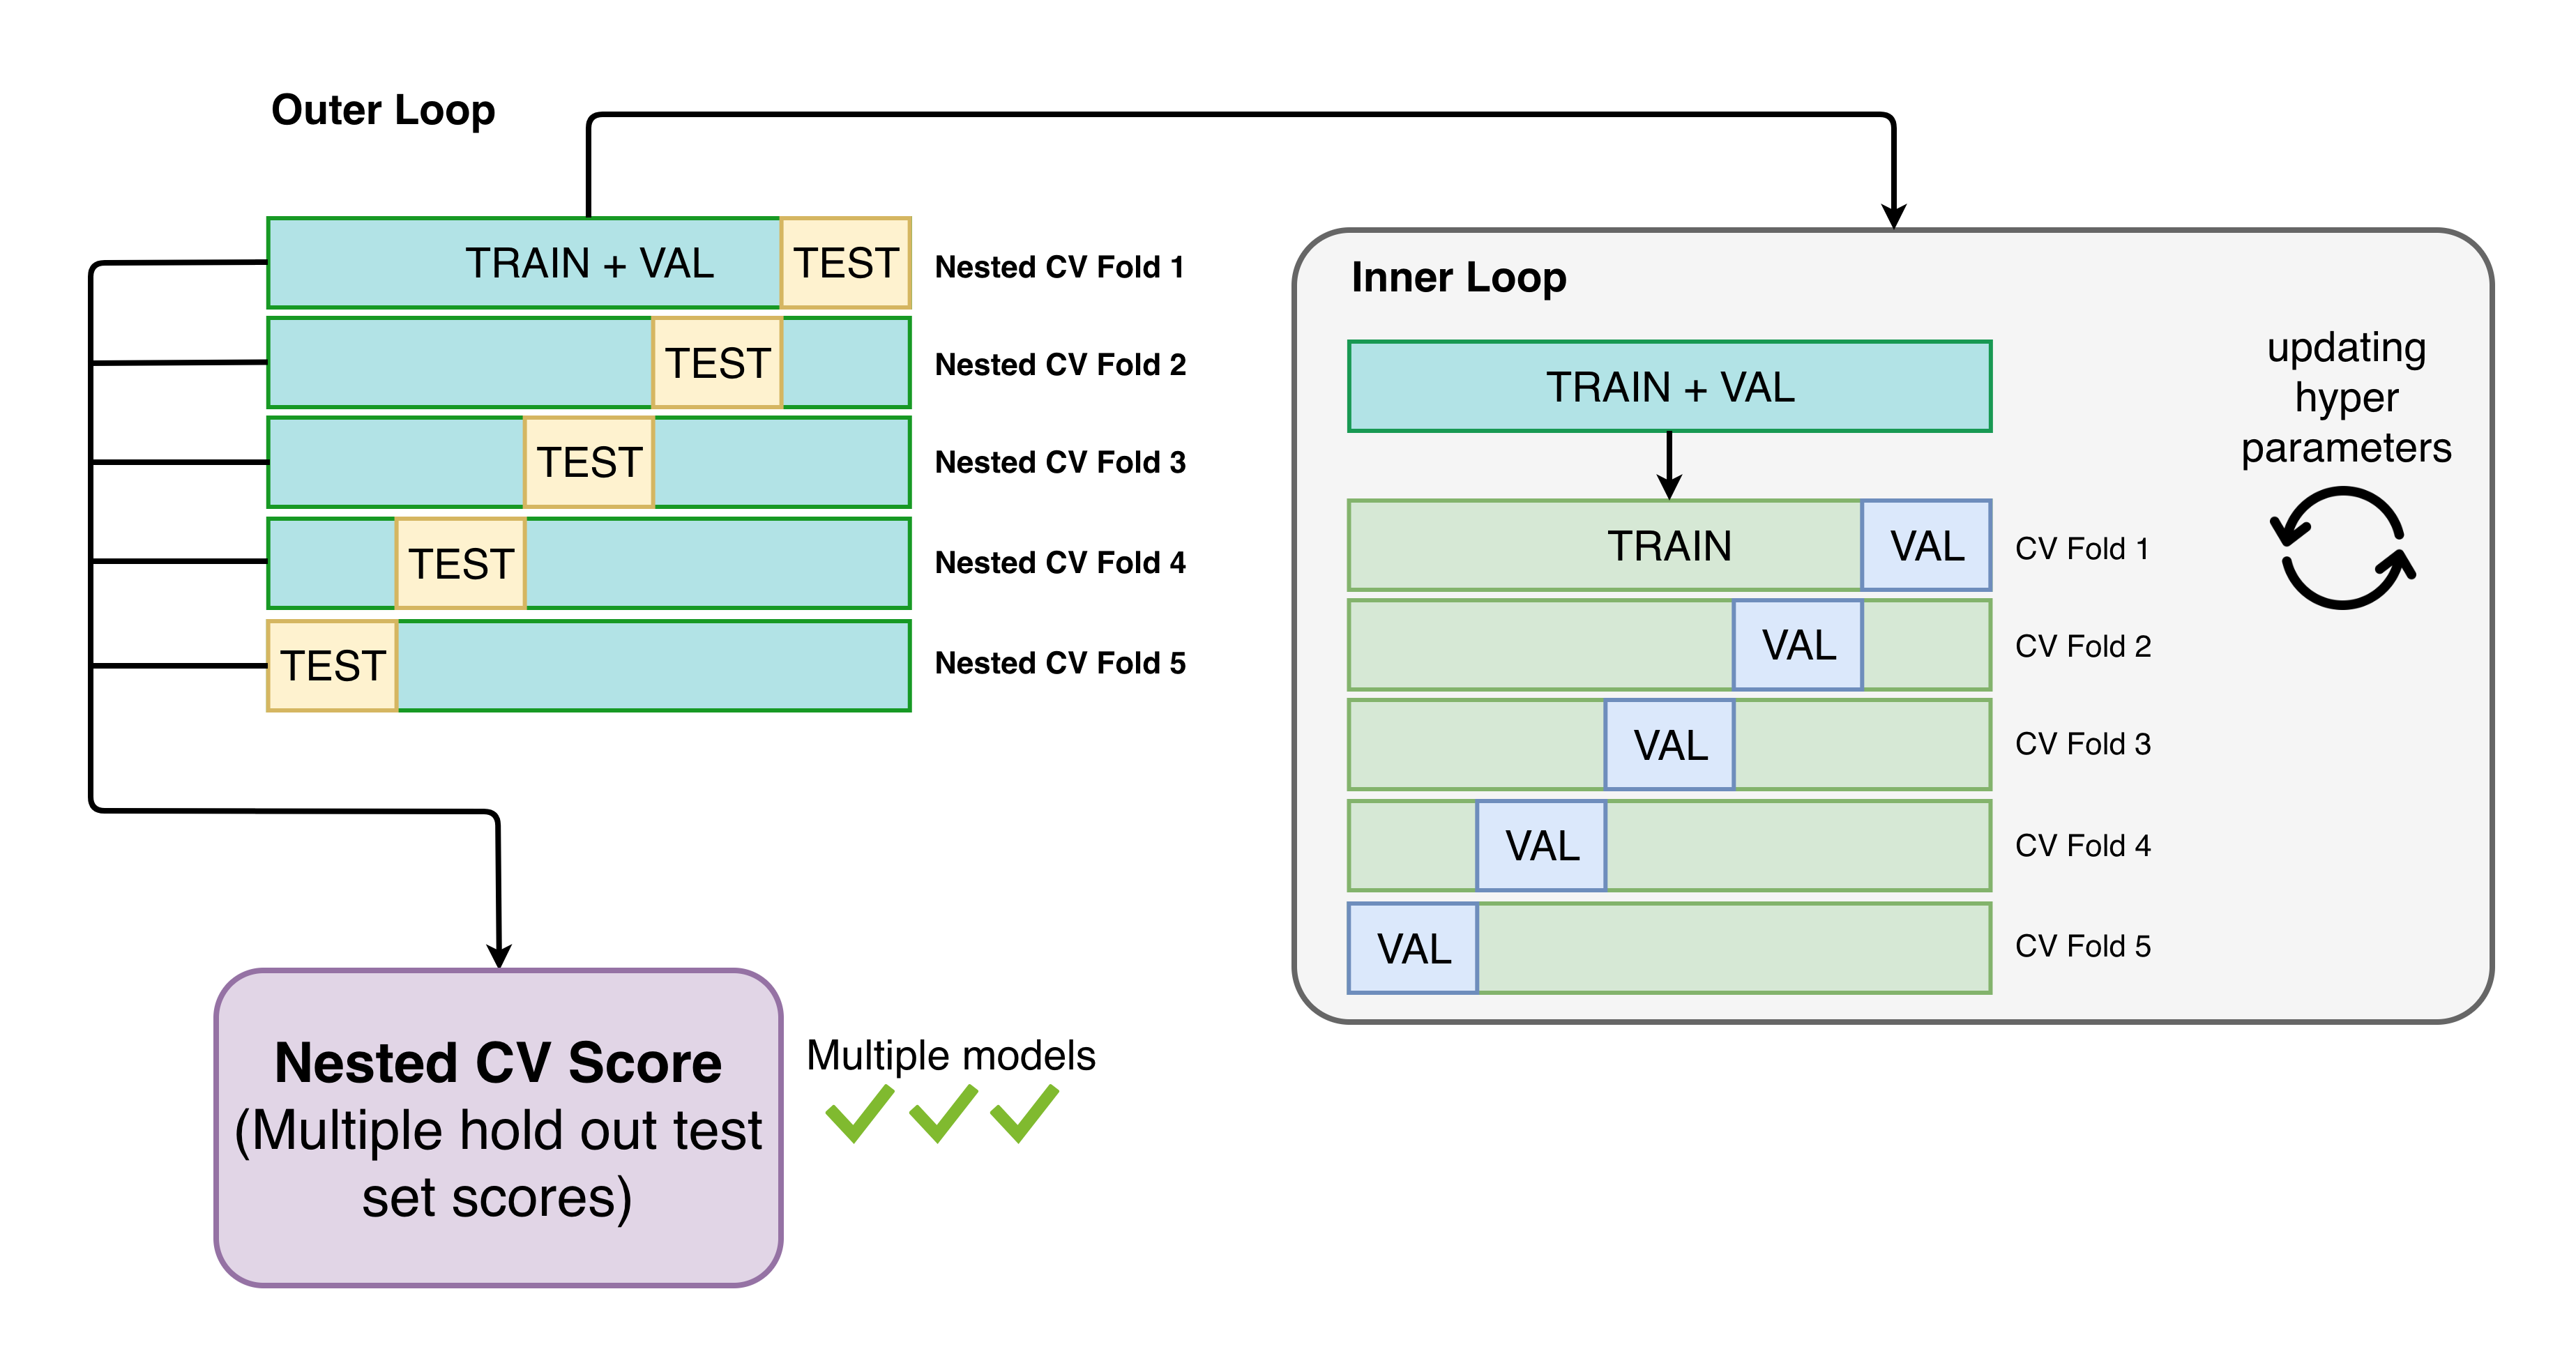
Nested CV is analagous to using multiple hold-out test sets.
Note: Nested CV is a computationally expensive benchmarking procedure!
Usage
MatPipe has a benchmark method which can be used for
automatically benchmarking a pipeline on a dataset. Once you have your
data loaded in a dataframe, the procedure is:
Define a k-fold cross validation scheme (to use as outer test folds).
2. Use the benchmark method of MatPipe to get predictions for
each outer fold
Use your scoring function of choice to evaluate each fold.
from sklearn.model_evaluation import KFold

# We recommend KFold for regression problems and StratifiedKFold
# for classification
kf = KFold(n_splits=5, shuffle=True)

from automatminer.pipeline import MatPipe

pipe = MatPipe.from_preset("express")
predicted_folds = pipe.benchmark(my_df, "my_property", kf)
benchmark returns a list of the predicted test folds (i.e., your
entire dataset as if it were test folds). These test folds can then be used
to get estimates of error, compare to other pipelines, etc.
Matbench
Interested in benchmarking your new algorithm in similar fashion? Or want to try an Automatminer configuration on benchmarking data?
Matminer provides access to the MatBench benchmark suite, a curated set of 13 diverse materials ML problems which work in Automatminer benchmarks. Learn more here: MatBench
Time Savers and Practical Tools
Using user-defined features
Often, there will be important features associated with your data which automatminer has not implemented. To use your own features for learning, simply:
include them in both your training and prediction dataframes
2. do not name the columns the same as AutoFeaturizer inputs (by default, “structure”, “composition”, “bandstructure”, and “dos”).
Thats it! Your features have been included in the pipeline, although depending on the pipeline configuration (such as feature reduction), the features may be dropped if needed. If you want to ensure your features are used for learning, see the section on customizing pipelines.
Ignoring columns
During prediction, MatPipe automatically handles dropping problematic columns
and materials inputs (e.g., structures) for inputs to ML. If you want to keep
columns in your predictions and prevent them from being used for learning,
specify the ignore argument to predict.
Let’s say this is the dataframe you’d like to predict on:
test_df
|
|
|---|---|
|
|
|
|
|
|
… |
… |
In this example, we want to keep the material-id column for identifying
our predicted samples and we don’t want to use it as a learning feature. This
is the intended use case for ignore.
Assuming you’ve already fit a MatPipe on the target my_property,
specify you’d like to ignore the materials column:
predicted_df = pipe.predict(test_df, ignore=["material-id"])
Your output will look like this:
predicted_df
|
|
… |
|
|---|---|---|---|
|
|
… |
0.449 |
|
|
… |
-0.573 |
|
|
… |
-0.005 |
… |
… |
… |
… |
The ignore argument also works when benchmarking with MatPipe.benchmark.
Warning
Ignoring columns in MatPipe supercedes all inner operations. If inner operations require a feature ignored in the MatPipe predict, the pipeline will fail.
Customizing pipelines
Overview
So far, we have only worked with the top level interface object, MatPipe, created through preset configurations. If you find the MatPipe presets are too restrictive, you can specify your own custom pipelines.
Here is a (very incomplete) list of things you can do with custom pipelines:
choose your own matminer featurizer sets to use
customize AutoML parameters
add, remove, or modify feature reduction techniques
change the imputation behavior and NaN handling
change feature encoding
modify featurizer prechecking and other automatic matminer operations
customize multiprocessing parallelization
and much more!
MatPipe is a container object for four sklearn BaseEstimator-like classes (called DFTransformers) doing all the real work:
AutoFeaturizer: (MatPipe.autofeaturizer) Creates and assigns features for each sampleDataCleaner: (MatPipe.cleaner) Prepares samples for input to ML algorithmsFeatureReducer: (MatPipe.reducer) Reduce the number of features with statistical learning.DFMLAdaptor: (MatPipe.learner) A machine learning adaptor to make predictions using an ML backend (e.g., TPOT). As of this writing, there isTPOTAdaptorandSinglePipelineAdaptor
The interface to MatPipe is the same regardless of the DFTransformers they are made of. Define custom pipelines by initializing these classes individually, then passing them into MatPipe’s __init__.
Modifying a preset pipeline
The easiest way to start making custom pipelines is by modifying a preset config, then passing it into MatPipe. In this example, let’s set the TPOT learning time to 1 hour and set the number of multiprocessing jobs to 4.
from automatminer import get_preset_config, TPOTAdaptor, MatPipe

# Get the config
config = get_preset_config("express")

# Define a custom TPOTAdaptor to replace the express one
config["learner"] = TPOTAdaptor(max_time_mins=60, n_jobs=4)

# Make a matpipe
pipe = MatPipe(**config)
Your custom pipeline is now ready to fit, predict, and benchmark.
A fully custom pipeline
Here we’ll show how to make a fully custom pipeline.
from xgboost import XGBRegressor, XGBClassifier

from automatminer import AutoFeaturizer, FeatureReducer, DataCleaner, \
    SinglePipelineAdaptor

autofeaturizer = AutoFeaturizer(from_preset="production",
                                cache_src="./features.json",
                                exclude=["EwaldEnergy"])
cleaner = DataCleaner(max_na_frac=0.05)
reducer = FeatureReducer(reducers=("corr",))
learner = SinglePipelineAdaptor(classifier=XGBClassifier(n_estimators=500),
                                regressor=XGBRegressor(n_estimators=500))

# Make a matpipe
pipe = MatPipe(
    autofeaturizer=autofeaturizer,
    cleaner=cleaner,
    reducer=reducer,
    learner=learner
)
We only specify a few options in this example, but each class is quite flexible.
Using DFTransformers individually
DFTransformers can also be used outside of a MatPipe, if you only need part of a pipeline. Each implements a ‘fit’/’transform’ syntax, where the input and output are dataframes (the same as MatPipe).
For example, if you are looking to generate features without any cleaning, feature reduction, or machine learning, do:
from automatminer import AutoFeaturizer

autofeaturizer = AutoFeaturizer(from_preset="express")

# Fit the DFTransformer
autofeaturizer.fit(my_input_df, target="my_target_property")

# Generate the features using the DFTransformer
df = autofeaturizer.transform(my_input_df, target="my_target_property")

# Or equivalently,
# df = autofeaturizer.fit_transform(my_input_df, target="my_target_property)